Disclosure: This post is all about our DIY Fireplace Mantel tutorial, and I also share some tips on how to stick to your budget with doing a big project, sponsored by the Visa Clear Prepaid program and the Green Dot ® Reloadable Prepaid Visa ® Card.

When you buy an old house, and it doesn’t have a fireplace, you feel robbed. At least I do! I always dreamed of having a real wood burning fireplace, but no such luck. So our next best option was a gas burning one. But what is a pretty fire without a beautiful surrounding? Jeremy {with a little help from me} built out the most beautiful fireplace mantel and cabinets, and I couldn’t be happier with how it all turned out.
We really wanted the mantel to be a bold statement, but with a very classic look. As you all know already, we love moulding and trim work, so it was an obvious choice to put in some details of that as well. We looked around the internet for inspiration.
We love a light and classic look. While we didn’t find exactly what we wanted, we got a lot of great ideas. That’s the greatest thing about finding inspiration, to use it as just that!
So without further ado, here was our process in building the Fireplace Mantel:
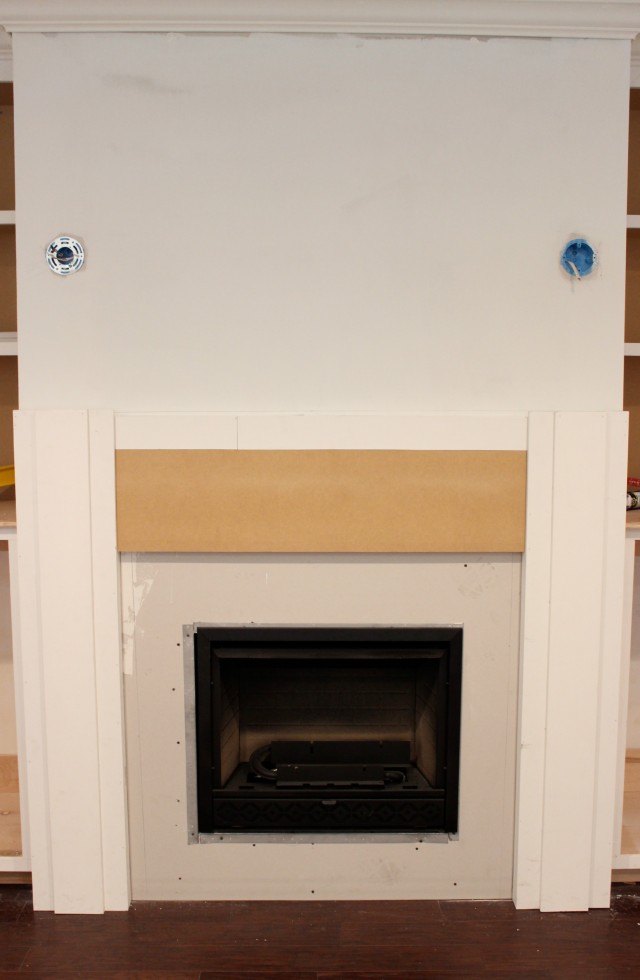
The key to building our mantel was to think about doing it in layers. First we attached 4 vertical 1×1’s to the drywalled flu.


You will notice the the 1×1’s on the inside are shorter than the outside, this allowed us to build the fireplace columns and attach them to the 1×1’s (like a cleat). Next, we built the columns by layering different sized boards. We established the width of the column leg we wanted and ran a 1×12 through our table saw. We cut the board down to approximately 10″. This will be the center portion of the column. To give the column depth we layered 2 1×4’s to the back of the center portion using screws (these will be hidden on the inside of the column).

We then attached 1×1’s to the back piece to create an elbow. This will allow the columns to protrude out. On the side closest to the fire we made the side piece shorter to accommodate the middle section.


Next we just slid the columns over the cleats. We then dry fit the columns over the cleats to ensure a tight fit. After that we attached three horizontal 1×1’s to the drywall that will support the middle section of the mantel and the top.


We measured it so that the horizontal 1×1’s rest on top of the vertical 1×1’s You will notice that there is a gap that will allow us to slide a piece of MDF in and attach it to the horizontal 1×1 and the columns.
We slid in a piece of MDF and a scrap piece of 1x. We were able to save some money and use scrap MDF. If we were buying it new we just would have cut it to size and not used the scrap piece of 1x.

Once all the pieces had been fit we secured the columns and middle section to the cleats using our finish nail gun. At the top of the column we left a gap that will allow us to attach a 1×1 to the top of the mantel at a right angle and slide it in. This added support to the mantel and gave us a surface to secure the top to.
For the top of the mantel we used a 1×10 and attached a 1×1 to the back at a right angle with our nail gun and some wood glue. We then slid it into place and secured it with the nail gun.

At this point it still didn’t look like much but we now had the base of the mantel installed and it was time to add the trim, which makes the mantel come alive.

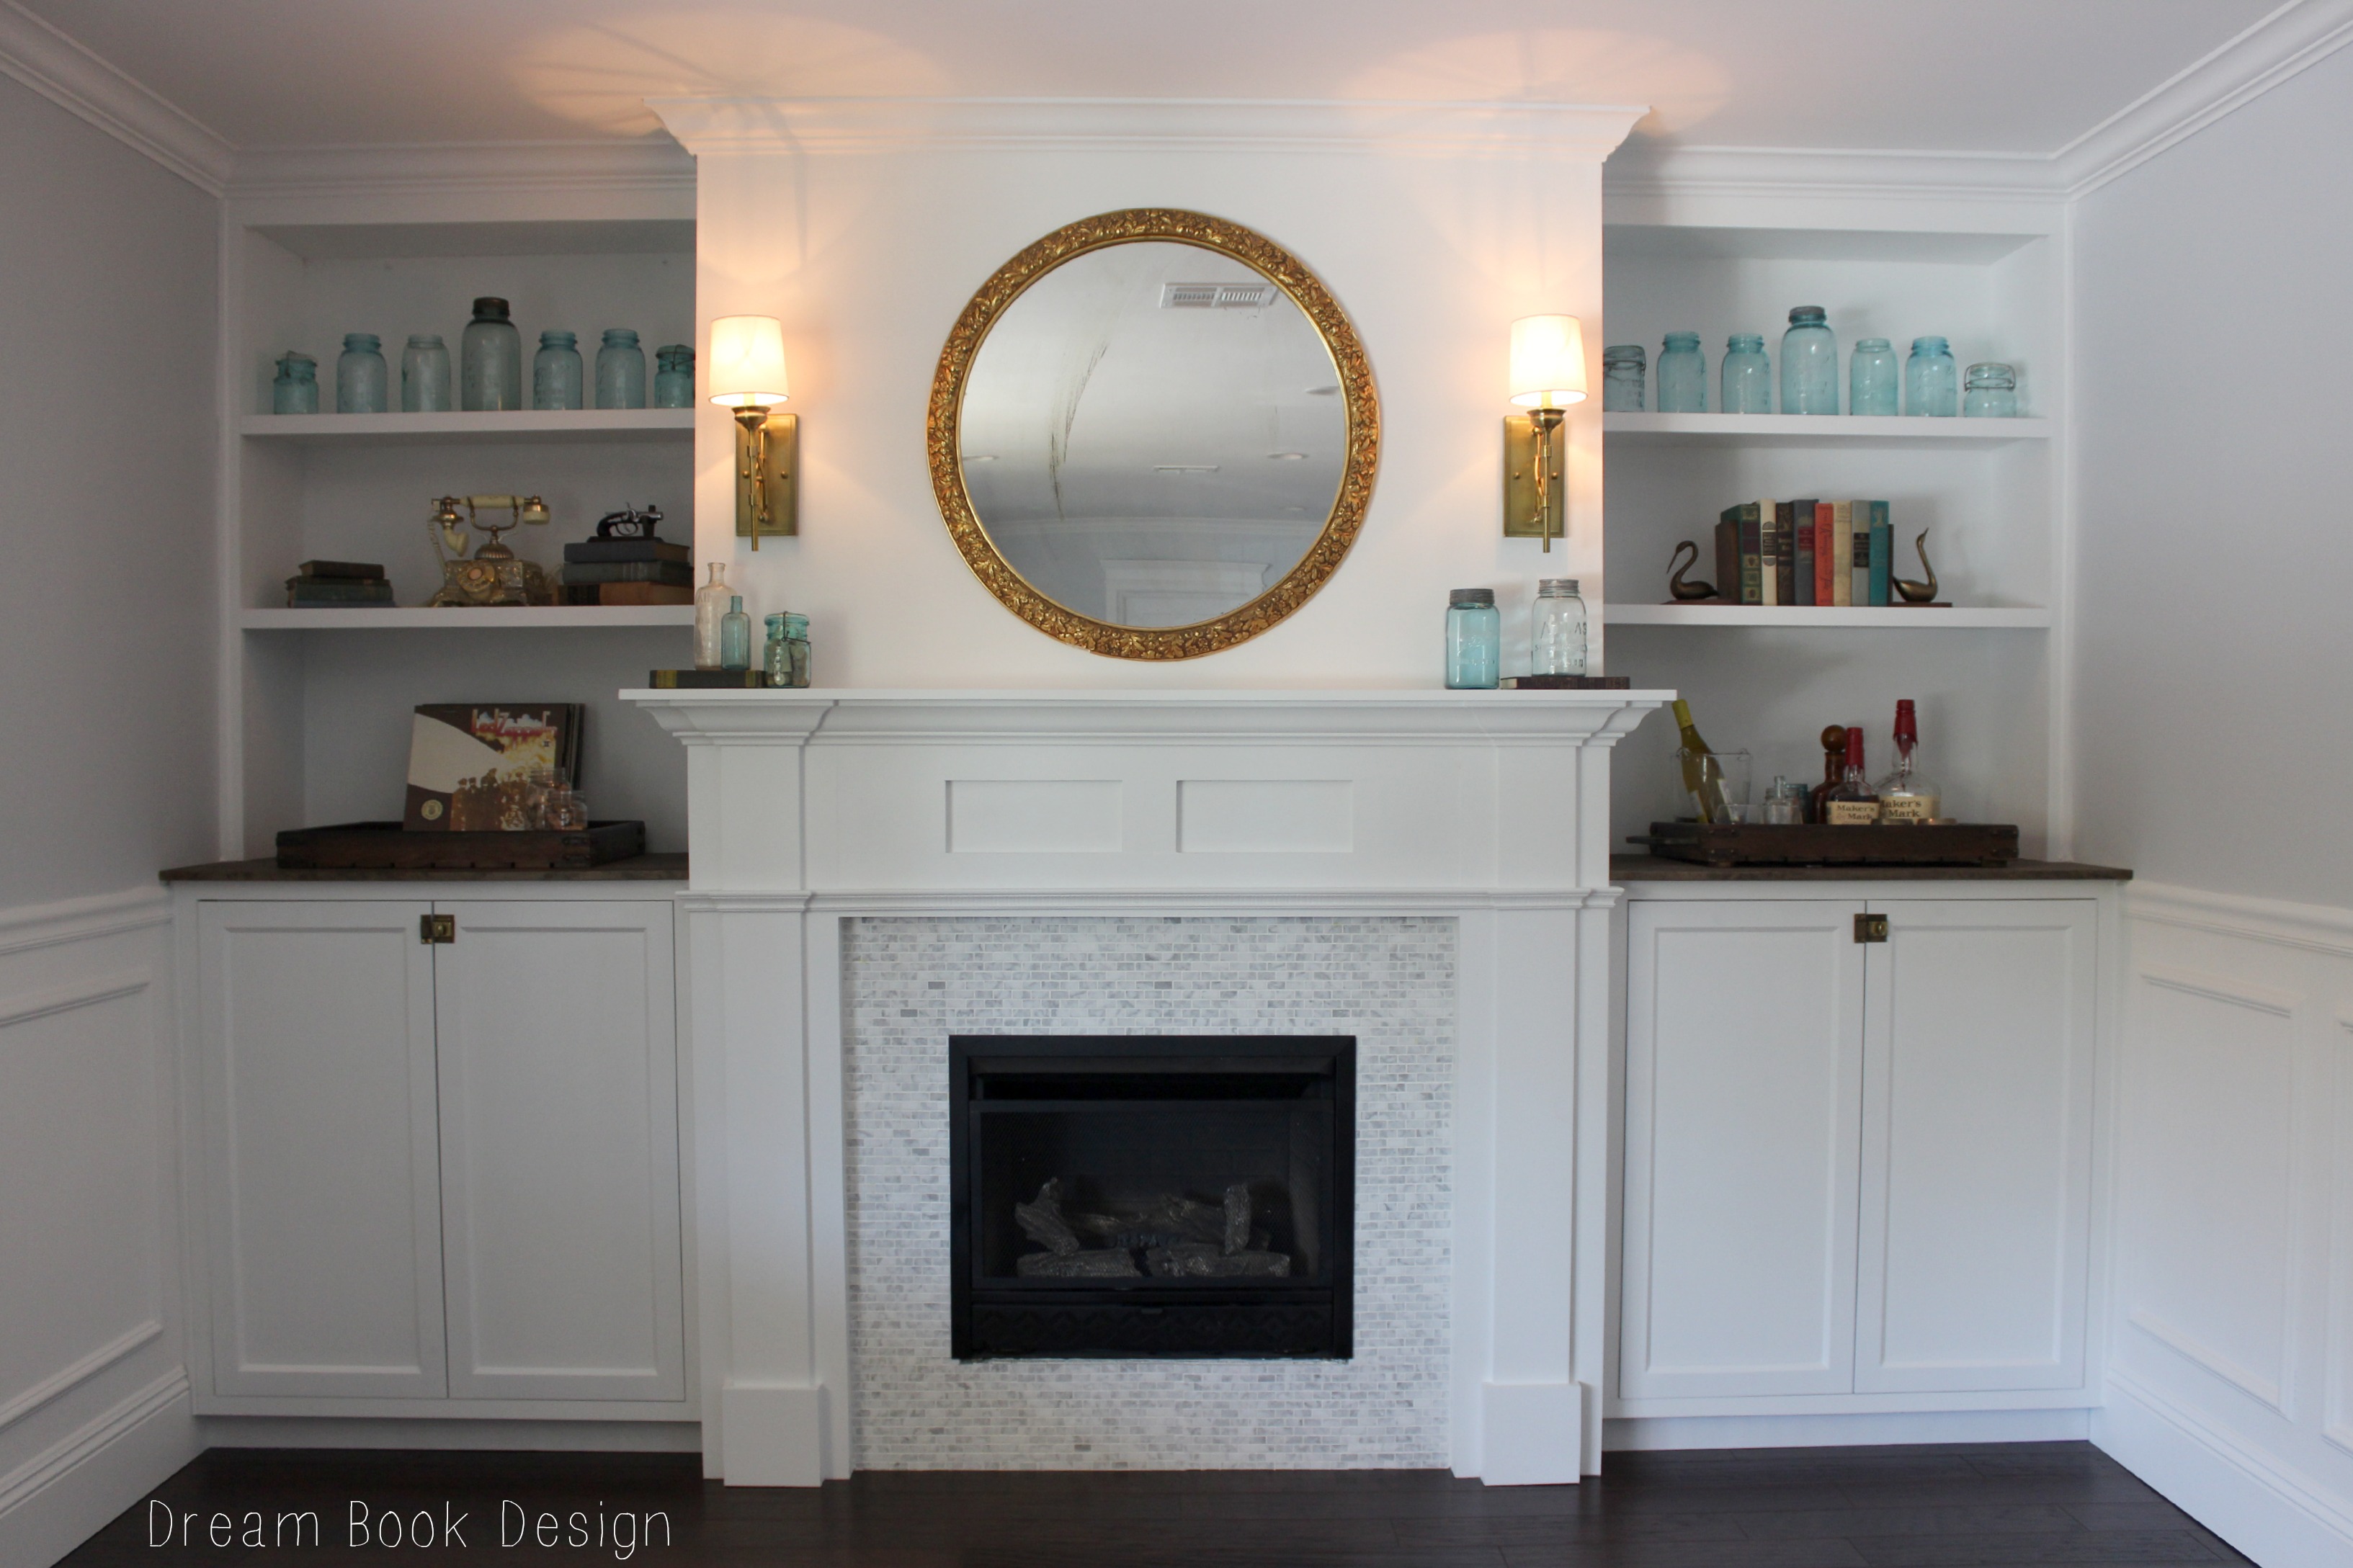
We added two strips of MDF to the middle section. These pieces sit flush with the columns and allows us to add depth to the mantel. We added a small piece of MDF in the middle and attached the crown underneath the mantel top. We cut the crown using the same process as we did for our door and window trim. We also added a bit of detail by adding some cove trim to the bottom of the middle section. These additions really make the mantel feel substantial and overall awesome! (at least we think so)!


We were now at the point where it was time to tile. For this project we again used Bondera and chose this marble tile. It is basically the same installation as our backsplash but required the use of a wet saw. We were able to borrow one from a friend and save a little money, but a tile saw is definitely on our tool list. We love the grey and white (as if that is a surprise) and thinks that it really classes it up.

Finally it was time to putty seams, sand, caulk and paint. We used our paint sprayer to do this it was such a big job. The MDF of the cabinets, shelves and mantel accepted the paint great. We used semi gloss Extra White.
Budgeting Tip: We are often on a tight budget when doing these types of projects, since with big projects the money seems to just flow out of your pockets! We’ve recently learned that an easier way to help stick to a budget with home projects may be to use a prepaid card like the Green Dot ® Reloadable Prepaid Visa ® Card, part of the Visa Clear Prepaid program. All cards that are part of the Visa Clear Prepaid program are required to clearly communicate their fee plans, so there’s a whole lot less confusion on your end! This way, you can just focus on sticking to your project budget!

It is also understandable that not everyone has the time and energy to start building a fireplace for their home. They can, however, get a new one installed by a professional. These are available in a lot of varieties from electric fireplaces to gas ones and more. Those looking to explore the options can go through a website like thefireplacestore.ca to buy the most suitable one for their household, according to their budget.

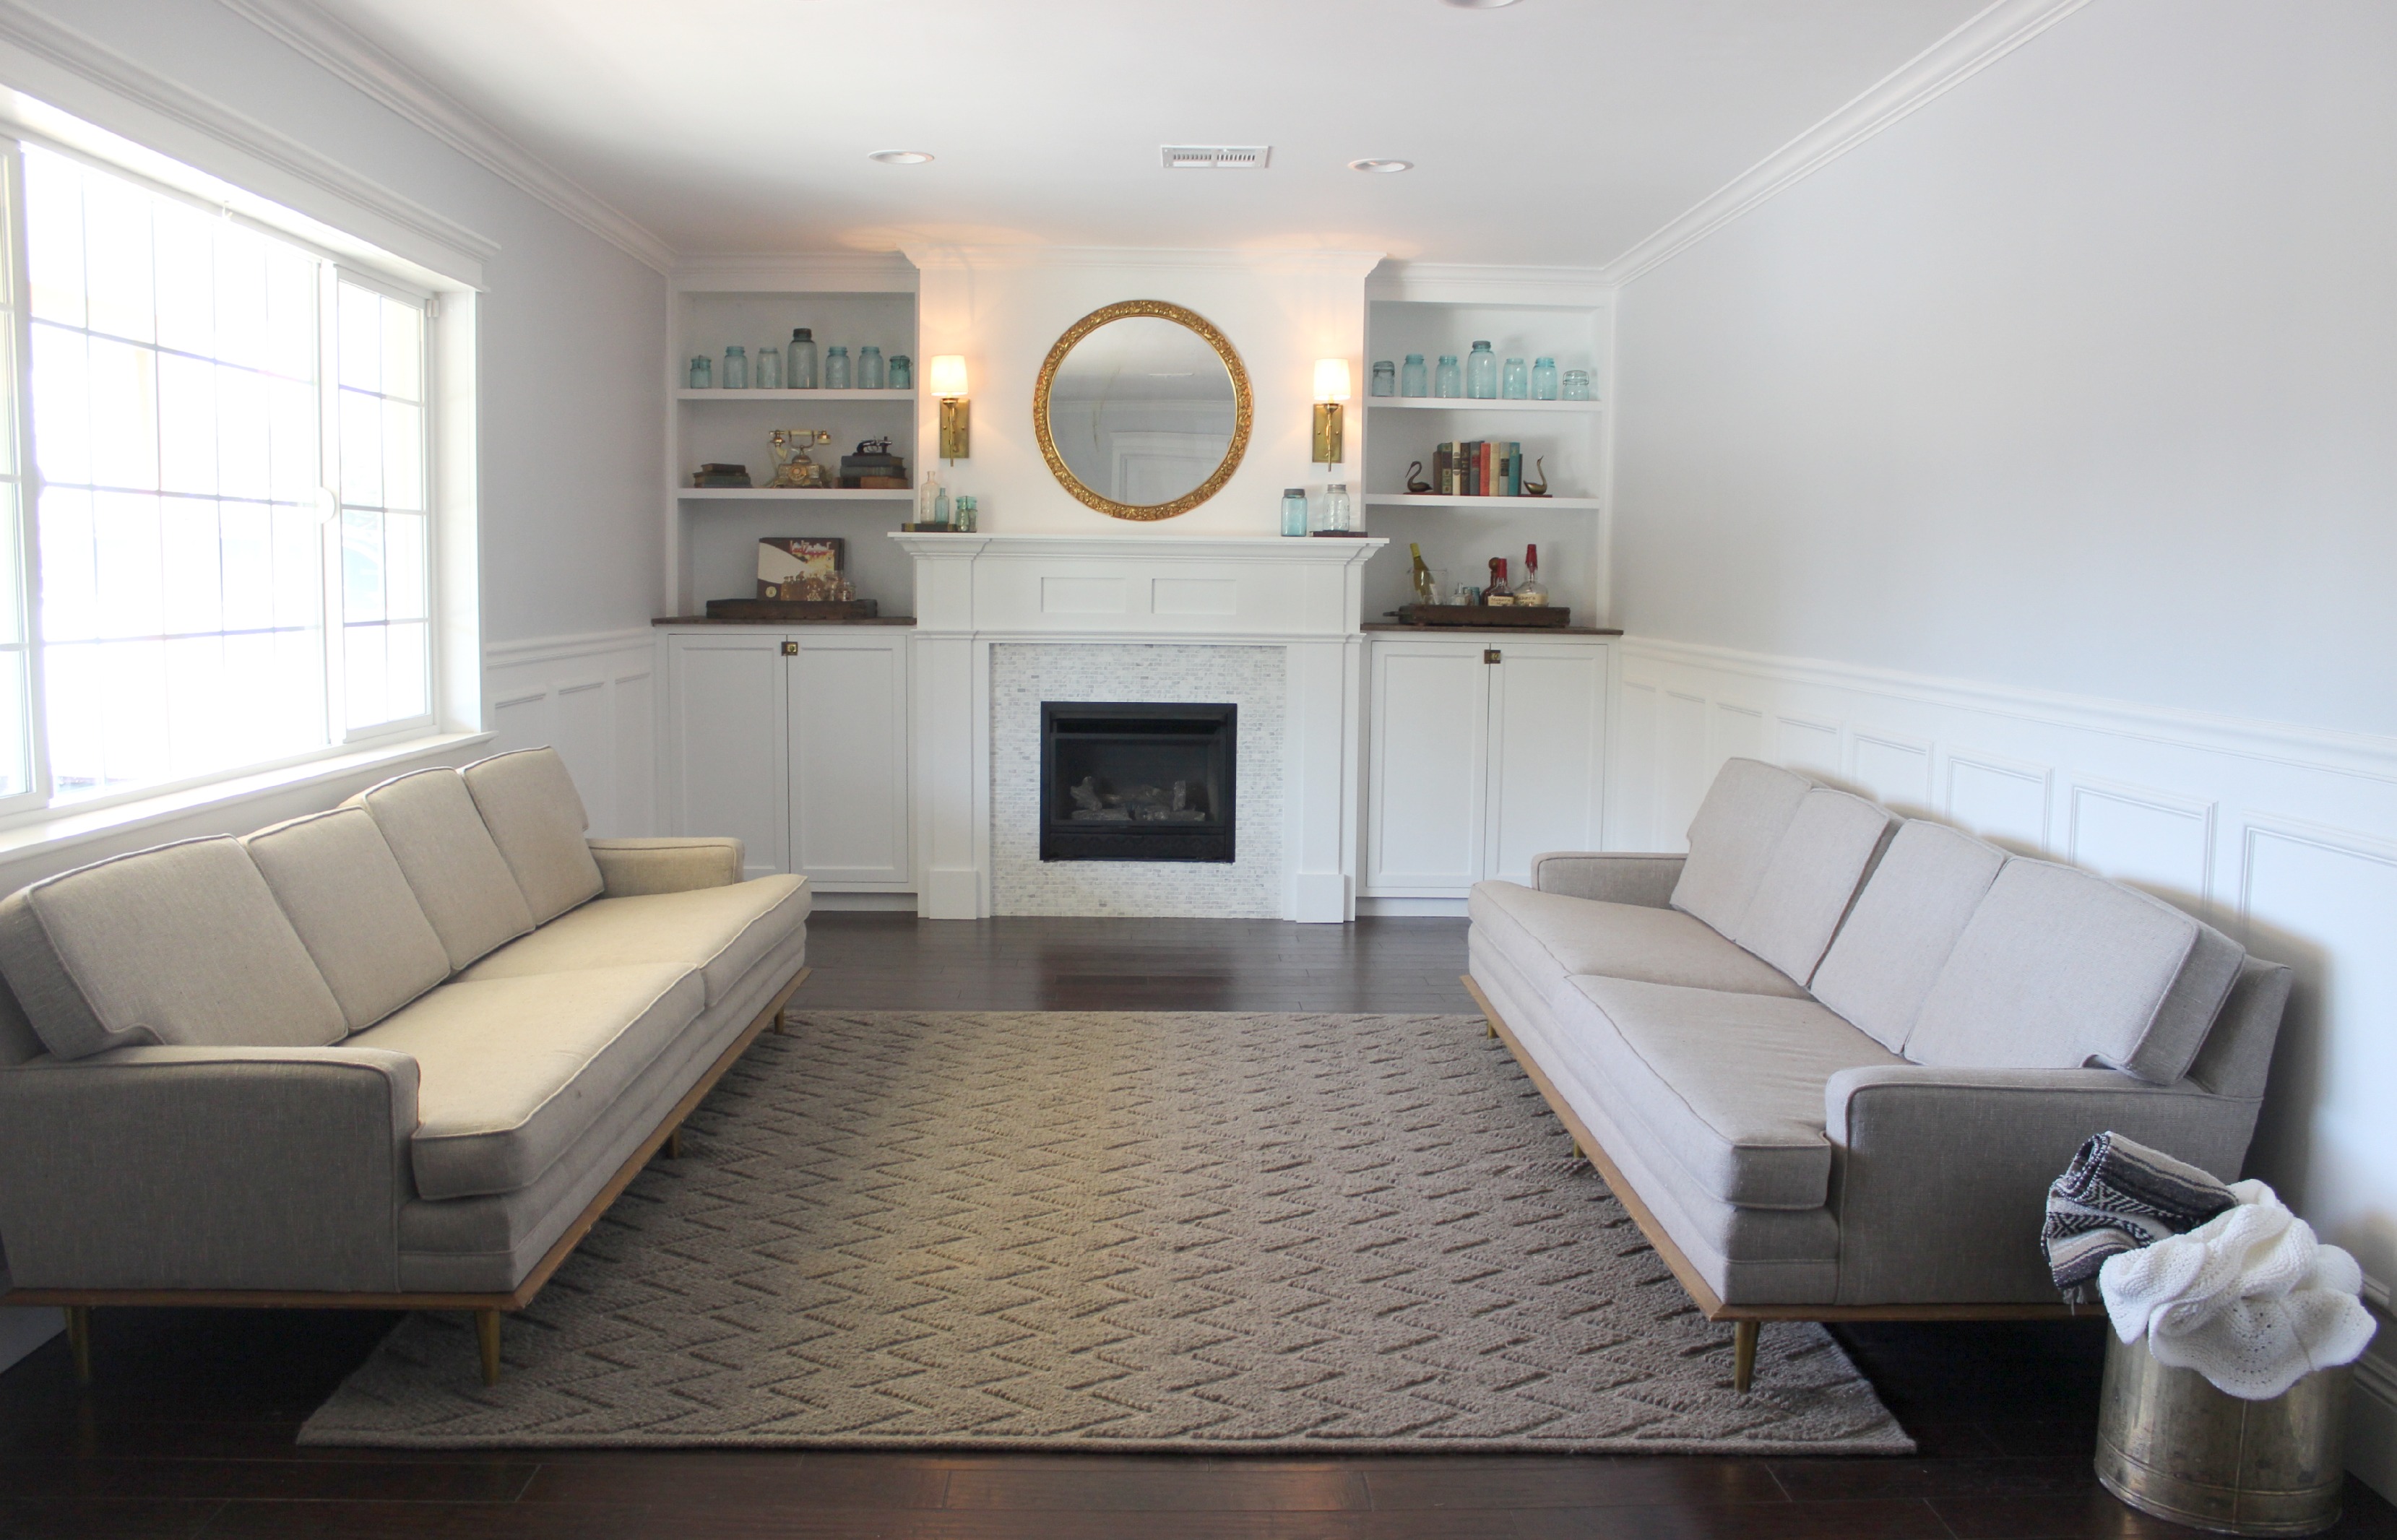
And even though you might have already seen it in our other tutorial posts, here is the before of that side of the living room {before we moved in}, and an after. Details on the rooms items here:

What do y’all think? Do you live in a place thats cold enough for a fire most months of the year, or are you like us Arizonans who use it just for a few?
This is a sponsored post written by me on behalf of Visa Clear Prepaid and Green Dot ® Reloadable Prepaid Visa ® Card

The before and after is truly amazing and looks like it should have always been there. Loving that tile, too. 🙂
Have a great day!
Angela @ Number Fifty-Three
love this. such a pretty focal point
marcy
Love it! How do you like the fireplace unit? Was it easy to install? We’re looking at adding one to our living room and wondered about venting out and all that stuff. I know this one is ventless, but wondering how it functions and also if it has a fan to blow warm air (we’re in Vancouver, BC… we need the heat!) 🙂
Hi Sandi,
So sorry for the delay. We LOVE the fireplace. It was very easy to install, after we had a plumber come out and run a gas line for us. It puts out a TON of heat, almost too much for this AZ home;) So it will definitely keep you toasty there in BC:) Hope this helps!
What a great tutorial, and I love the tiled mosaic background – very classy. It looks like an easy task if you know what you’re doing and have a bit of talent – and I need to see if it’s something my hubby can do.
Great tutorial and it looks absolutely gorgeous!! The tile is a nice touch!
This is beautiful – I’ll be keeping it in mind when we *finally* get around to finishing our bedroom fireplace. We have several fireplaces (live in Utah in an area where we usually get a lot of snow, and it’s cold!) But have never gotten around to finishing that one in the bedroom.
You did a great job! Adds such richness to the room 🙂
Gorgeous!! Really makes me wish I had a fireplace!
I love how your room looks – it’s very minimal, simple, but warm with some glam. The marble tile definitely adds that bit of sparkle! Good job on the mantel!
I love the mantle redo. The tile selection is perfect! It is a very calm and welcoming room.
You have achieved truly spectacular effect! I love when hard work is worth every single minute! Well done you!
Wow! What a transformation! I love the fireplace addition. The bookshelves really add a neat dimension too.
If I had room, I’d invite you over to design one for me!
Wow! The transformation is amazing! Here in Illinois, this winter has been extremely brutal. Because of that I am wanting our next home (we currently rent) to have a fireplace in the event the power goes out and we need to rely on another source of heat. Practical and beautiful!
Nice work. we don’t even have a spot for a gas insert in our apt. 🙁
Erica
We Three Crabs
Stunning! We live in an older house with no fireplace and we would love to have one. You showed me that it’s possible! Now I have to figure out where to put one! Great post! Thank you so much for the info!
That is awesome! I would never believe it if I only saw the after that it didn’t come with the house! Great job and thanks for the tutorial!
Wow! That is beautiful!! We have a real wood fireplace in our basement, but it’s not that pretty. I can’t wait to remodel it someday (along with the rest of the house!), but it hasn’t reached the top of the to-do list yet.
I would LOVE to have a fireplace, and the job that you did is home magazine quality, and so lovely to look at. I think the circular mirror really makes everything pop, and the shelving looks like a real treat – so many different ways to dress them up. Also, the tile is very eye-catching and attractive. Very impressive job!
Your fireplace turned out beautiful, great job! I also love the antique, blue mason jars. They have always been my favorite.
Wow, that is gorgeous! I live in Canada and we definitely use fireplaces for the majority of the year. Even in June it gets really cold here in the evenings sometimes and a fire is wonderful!
You guys did a wonderful job! We never realized how much we loved fireplaces until we moved into a home with one, now we use it all the time during the fall and winter months. Yours looks absolutely beautiful!
We have two fireplaces, but do not use either very often. However, I love having two mantels and switching out the decor each season! Your DIY project is beautiful! Great detail in the instructions, making it easy for others to create their own!
Oh my gosh I love how it turned out. I especially love the built ins!
Wow, you guys totally nailed it. It looks great. I love wood floors, fireplaces and built ins. We have a wood stove insert which we had professionally installed after we bought our home because it was revealed during our inspection that our fireplace was not safe to serve as a regular wood burning one. We went for one that would serve as more of a focal point of the room than just a stove, and I really love it! I’m ready for winter to be over, though! Too much snow. 🙂
A mantel makes such a big difference! You did a great job, it looks great!
Absolutely lovely! I really like the set up of the whole room — perfect for conversations or parties. Thanks for sharing!
you make it look so easy! the end result is amazing!x
Gorgeous! I would definitely get a lot of use out of a fireplace here in Vermont.
This is beautiful! Can’t believe it was a DIY project…definitely looks like something out of a magazine!!
Wow! This is just amazing and of course I had to pin it! I love the colors, I love the idea, and I love how perfect it looks. Thank you so much for sharing. Makes me want to flip a house.
Job well done. It makes me wish I was handy to do something like this. I love the look of your entire room. You’ve done a great job. I would love to have a fireplace – maybe when we move.
Wow! I can’t believe you did this by yourself! Truly stunning. Looks like an editorial from a magazine!
Wow, that is simply gorgeous! I grew up with a fireplace and it’s the best feeling cozy-ing up to a fire. No fireplace now, but I consider a gas one since you make it look so nice!
What a beautiful transformation!!! I love fireplaces, and it’s a must have for my house!
Wow.. before and after pics are amazing.. and the light shades create a sense of space. Great thing that the room already has a large window, that allows for pleanty of natural light in the room. I surely have some ideas to discuss with my gf now.
Just lovely! I love how balanced the room is. Very minimal and elegant and the spot of color is perfect!
Sheila
SeeSheilaRun
That fireplace is gorgeous! We never use ours, because it is never cold for very long here and our heating system takes care of it just fine. But I do love the look of fireplaces and couldn’t imagine not having one, even though we don’t use it!
I’m an Arizonan with no fireplace 🙁 I miss having a mantle though: yours is classy and beautiful!
That does remind me, my old apartment had a fireplace, but it was such a tiny space that we ended up putting the piano right in front of the fireplace! It fit exactly underneath the mantle. It worked out for us… I still had my mantle to decorate with!
That’s an amazing transformation! Love it!
We do not have a fireplace… and in San Diego, we definitely don’t need one (although our next door neighbor has one). I do like how fireplaces give a real focus to a living room but really can’t justify one in our house.
Your fireplace mantle looks original to the room. It is elegant. Love the clean lines! The wall lamps and round mirror are a lovely, classy ensemble. Oh, your vintage jar collection is amazing too! There is nothing that should be added, or taken away! Love it!!
This is beautiful and I love the step by step photos. I hope to have a fireplace in my next house and this may be used as inspiration for us!! Thank you 🙂
Oh my goodness, that is beautiful! You did a spectacular job! Your photos and text did a great job of making the project seem doable. I already have a beautiful mantel but if I was going to redo it this article would really help. Thanks for sharing, Bobbi
Amazing! Thanks for showing the before and after pics! I literally said, “Ahh!” when I saw the after. I love clean lines and simplicity. I could live in that room! I’ve always been one for earth tones in the past, but I’m leaning more towards the neutrals. Great tutorial! Thanks for sharing.
How lovely. I agree that a room looks bare without a fireplace. We’ve only lived in one new house which didn’t have one – and it never felt like home.
Absolutely beautiful. What a talented hubby to build that.
Absolutely beautiful!!
Thanks Megan:)
This is absolutely gorgeous- you did a great job! We are planning on adding a mantle and surrounds to our family room fireplace. I pinned this for inspiration!
Thanks Nina!! We definitely love what it did for the room, so good luck when your time comes:)
This transformation is INCREDIBLE!! Great job! I am wanting to do something similar in my home. Thanks for the inspiration!
Thanks so much Brandy! We love the outcome:)
Thanks for sharing such a thorough step-by-step. I also was sad that my first home, purchased a year and four months ago, did not have a fireplace. I bought an electric fireplace on Craigslist and it came with a great mantel. Even though it had kind of a laminate coating, I was able to paint it to match the room’s trimwork and now everyone comments that they thought the fireplace was part of the house! Now, I decided that I REALLY need built-ins on either side, but I’ve been trying to figure out how to make it work with the crown around the mantel’s edge. I was thinking of ways to adapt the mantel, but I was stumped. Thanks to your post, I realize that I TOTALLY have the skills to just make my own mantel and built-ins, which will then match perfectly! In Seattle, a fireplace is practically a necessity. Nothing combats “wet-cold” more effectively!
Hi. Where did you purchase your tile, and do you have the product number for it?
From floor n decor No number though-sorry!
Hi This is just beautiful we are wanting to do this but my question is, How do or where do you hide the boxes and the wire for your sattelite system we have a FIBRE-OP and have direct internet feed
so we also have the modem as well we hat how it all looks and wanted to hide it please avise us
thanks Lisa ad Glenn Ivany
Grand falls -windsor, N.L CANADA
I love your style. I looked closely at what you used on the shelves. The jars are easy and affordable. Love it! I saw some dark blue jars at the grocery store the other day. I may need to go back and get some.
Thanks April! Go get ’em!
This looks amazing! Just curious, what color of paint was used on the walls, above the moldings? It’s so subtle, I love it!
Thanks Jenna! The grey color is Sherwin Williams Olympus White! We love it!