
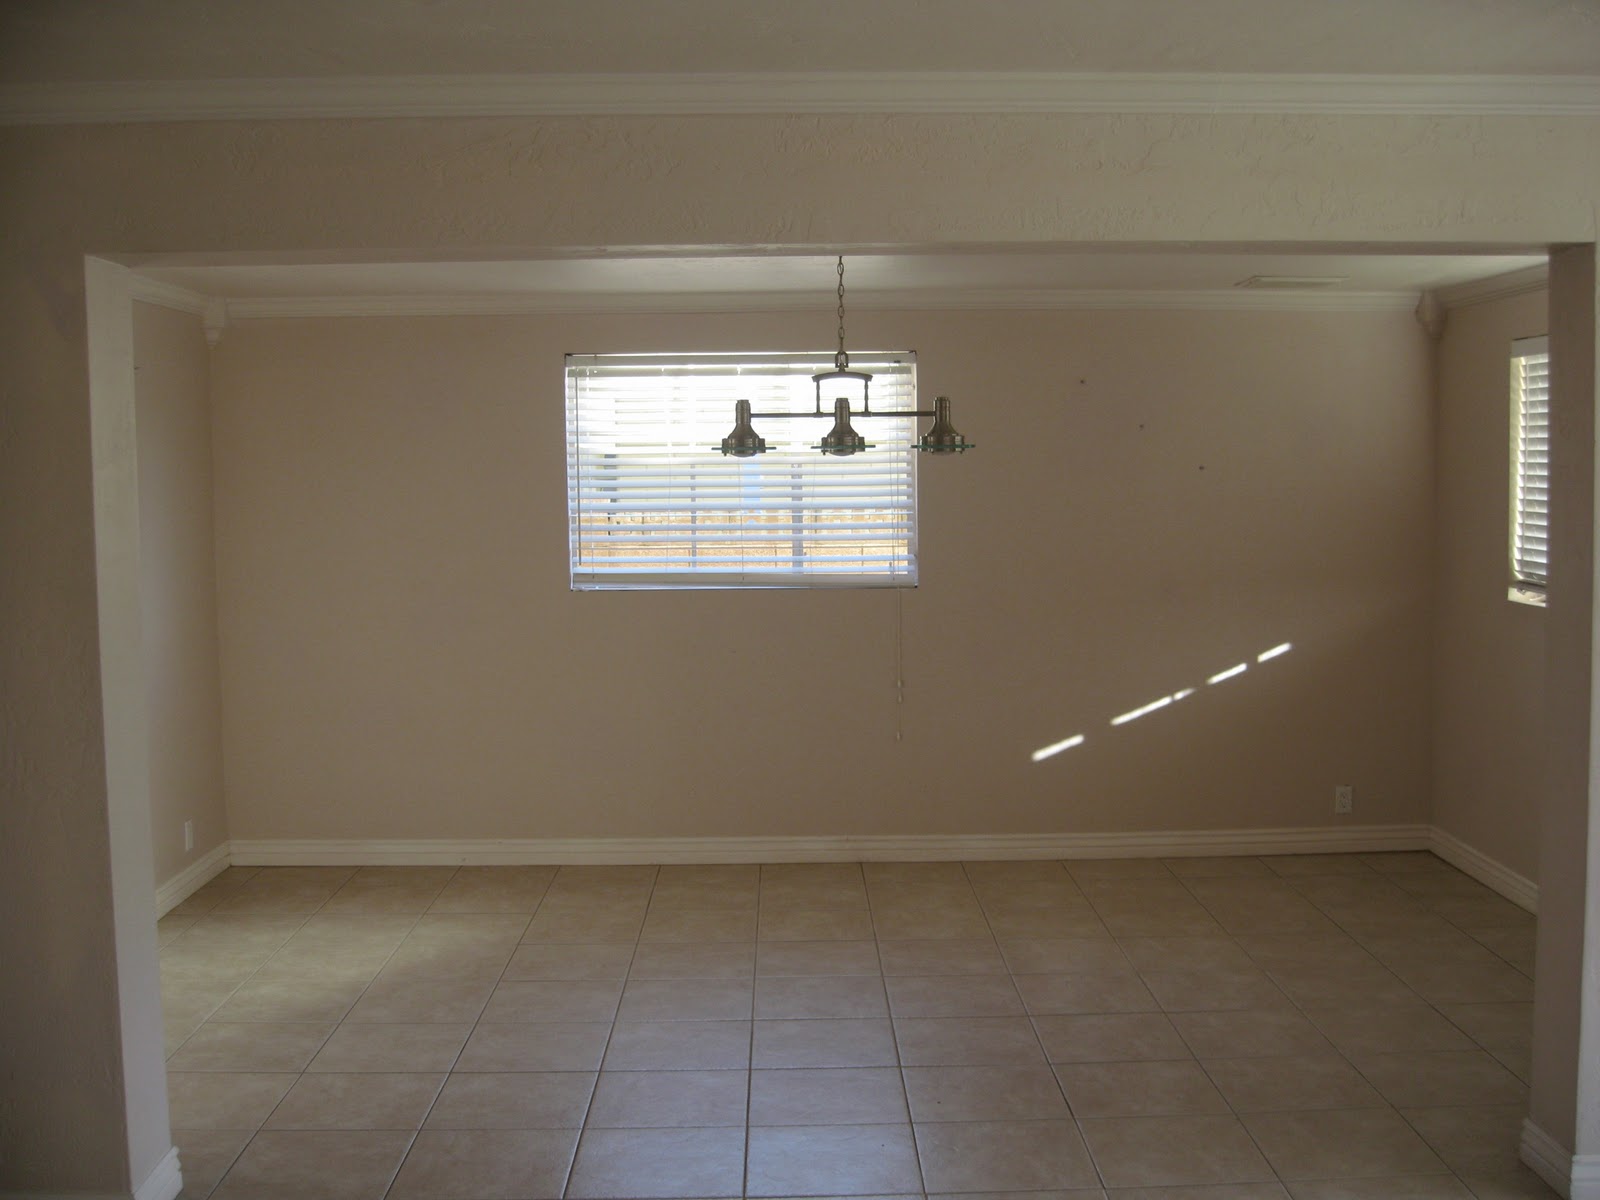
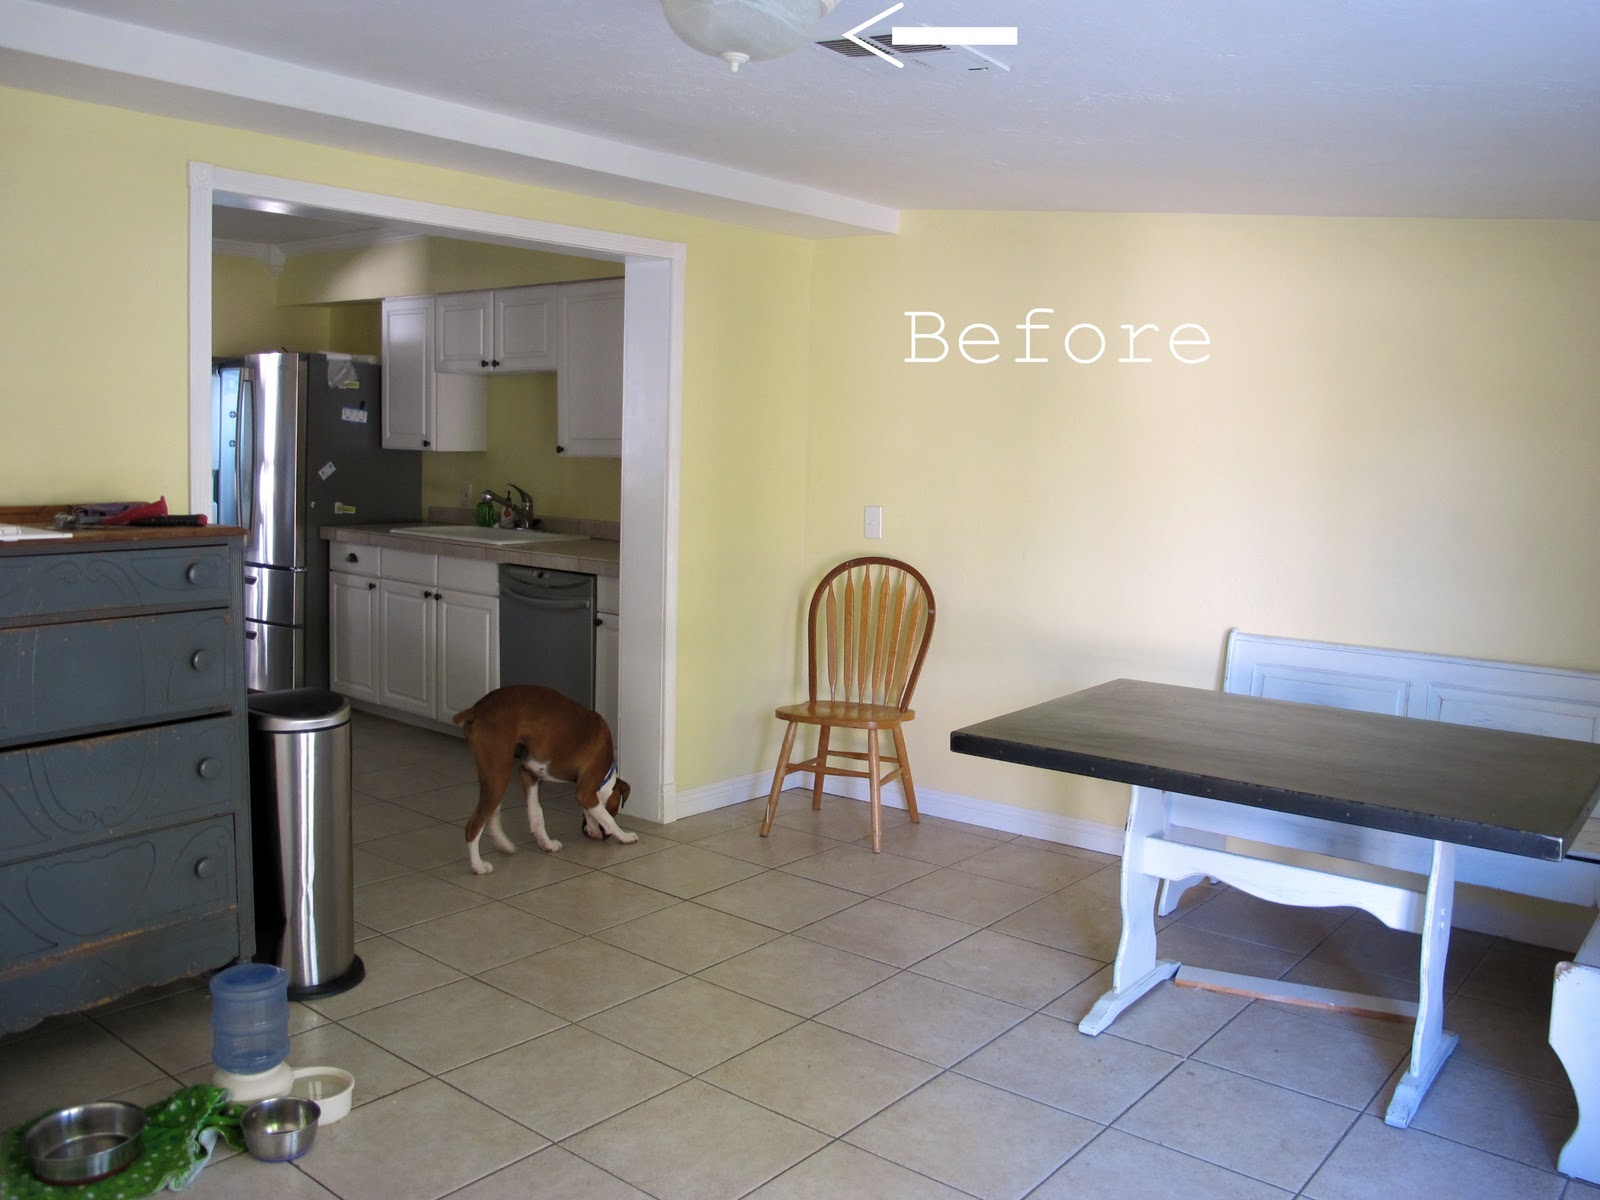
It all started with this:

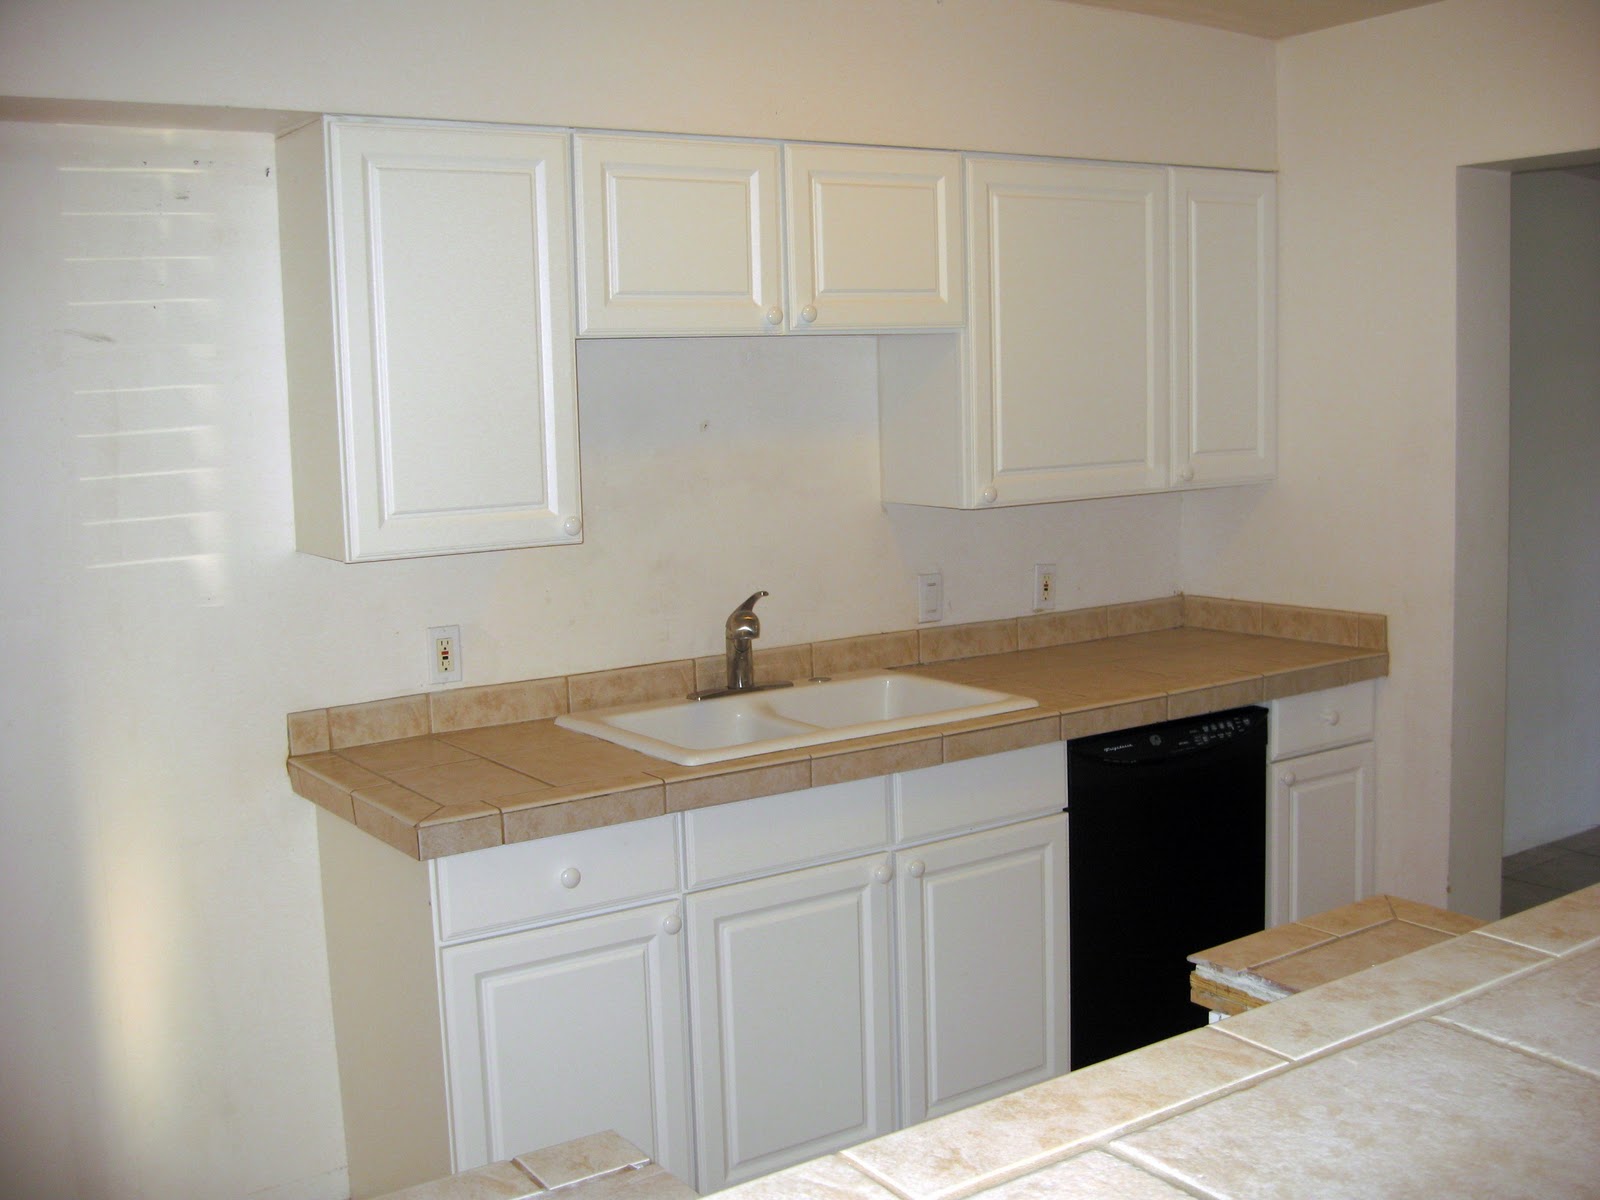


- cabinets going wrong
- the sink not being correct
- the DIY hardware being installed
- the mounds, upon piles, upon heaps of garbage in the backyard
- the paint color changing three times {yep, you heard me right, THREE TIMES}The paint color we went with is Benjamin Moore- Stonington Grey. We put the color in a Behr Ultra Premium Plus eggshell base, because we love Behr:)
- the insane demo process
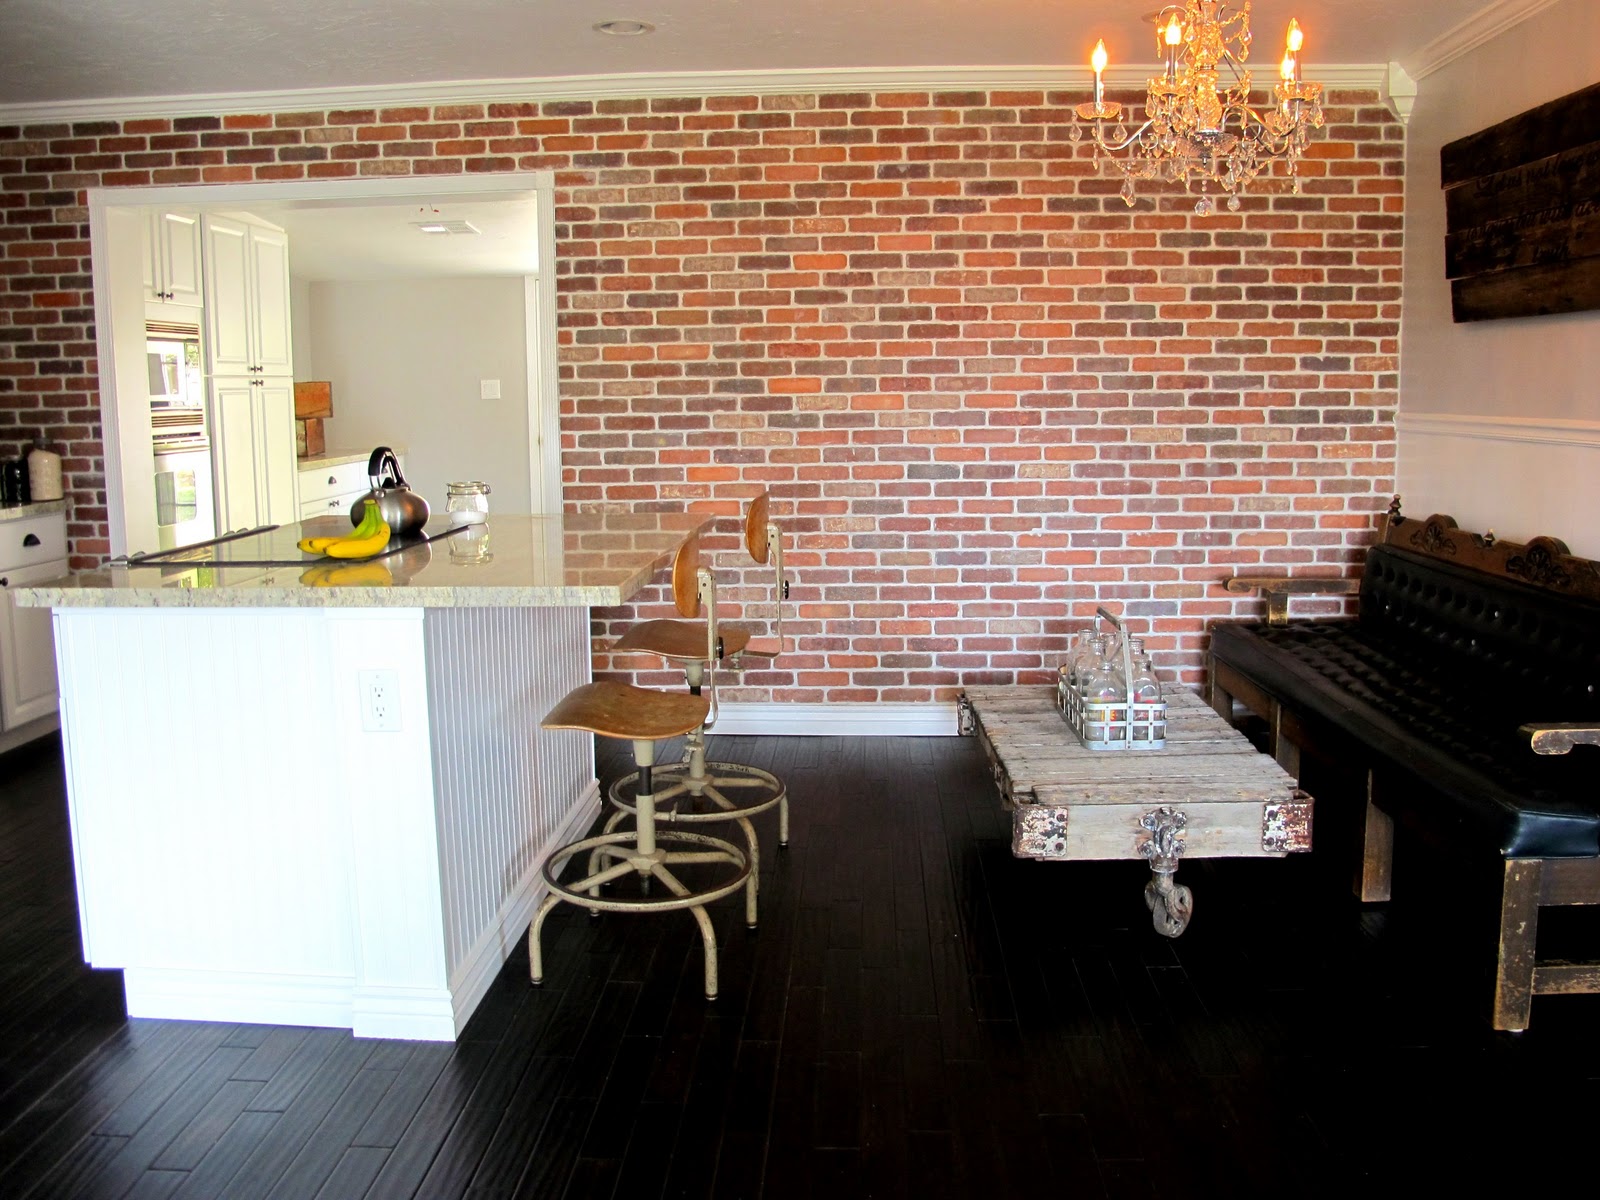
- the beautiful brick wall that stole our hearts


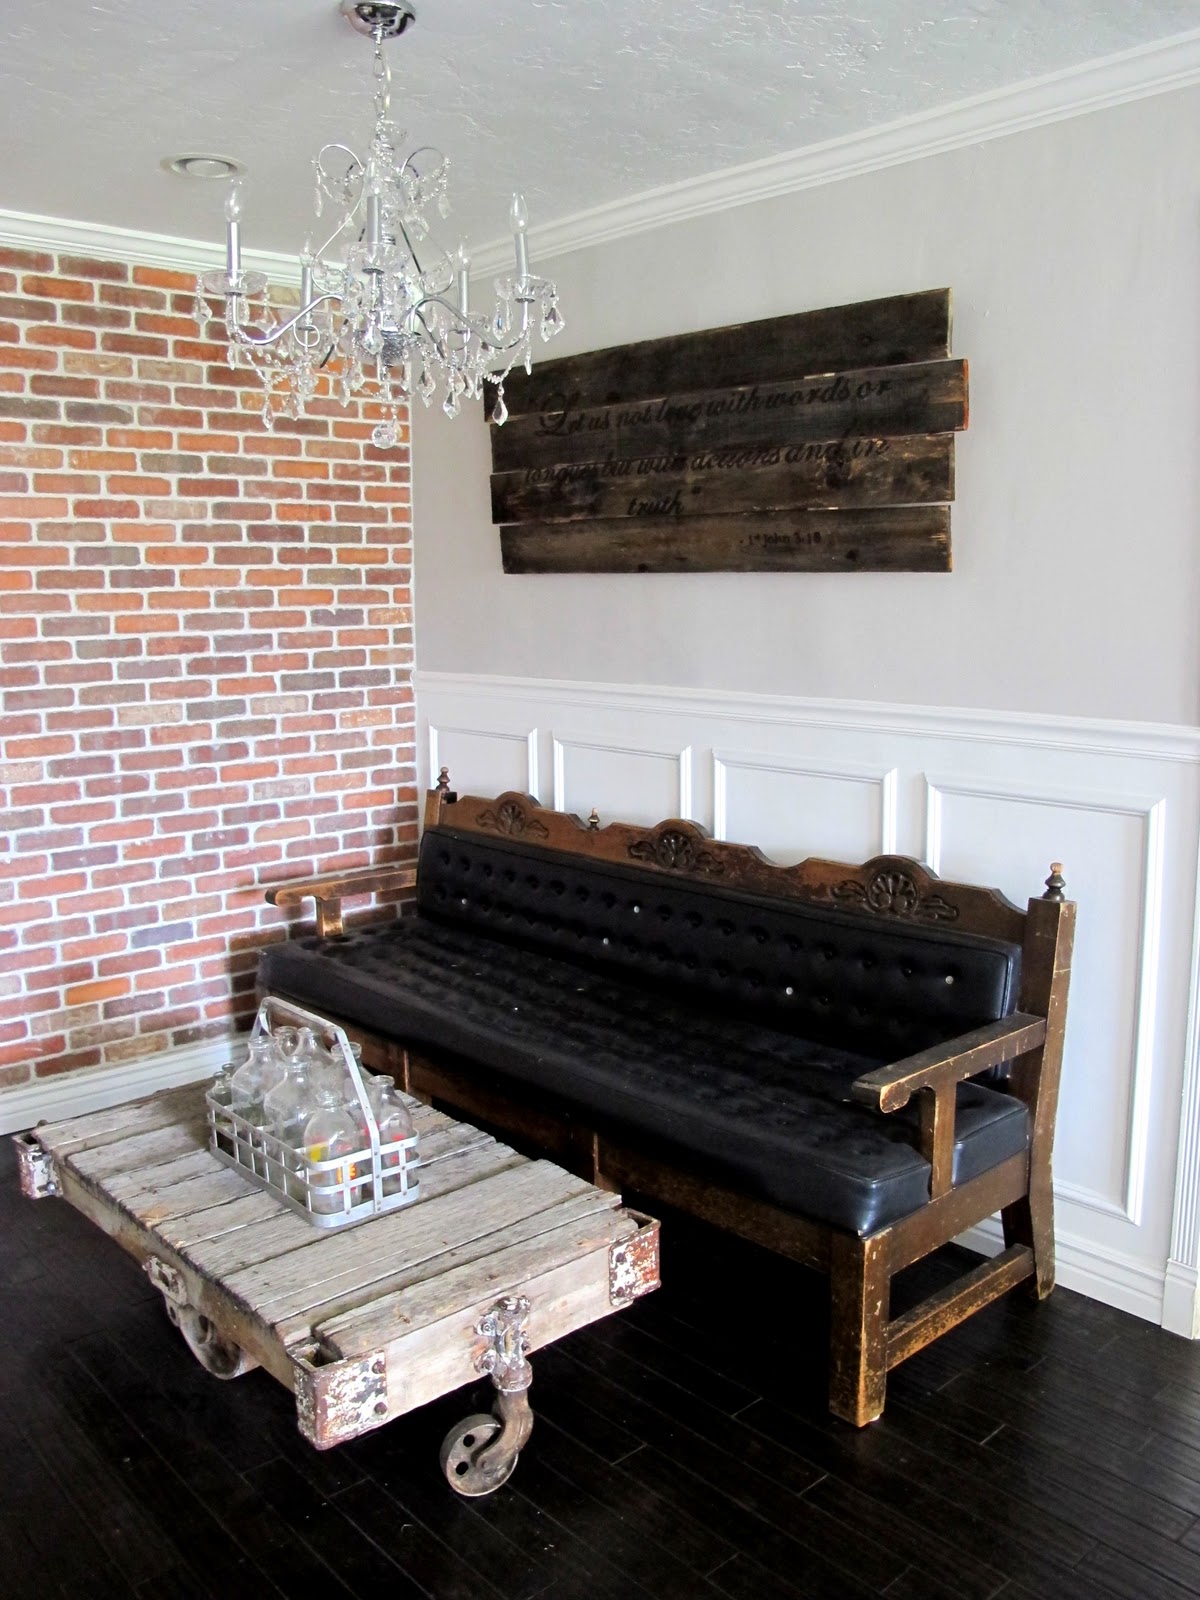
Looking straight ahead here, this was the area of our old laundry room. It now is a
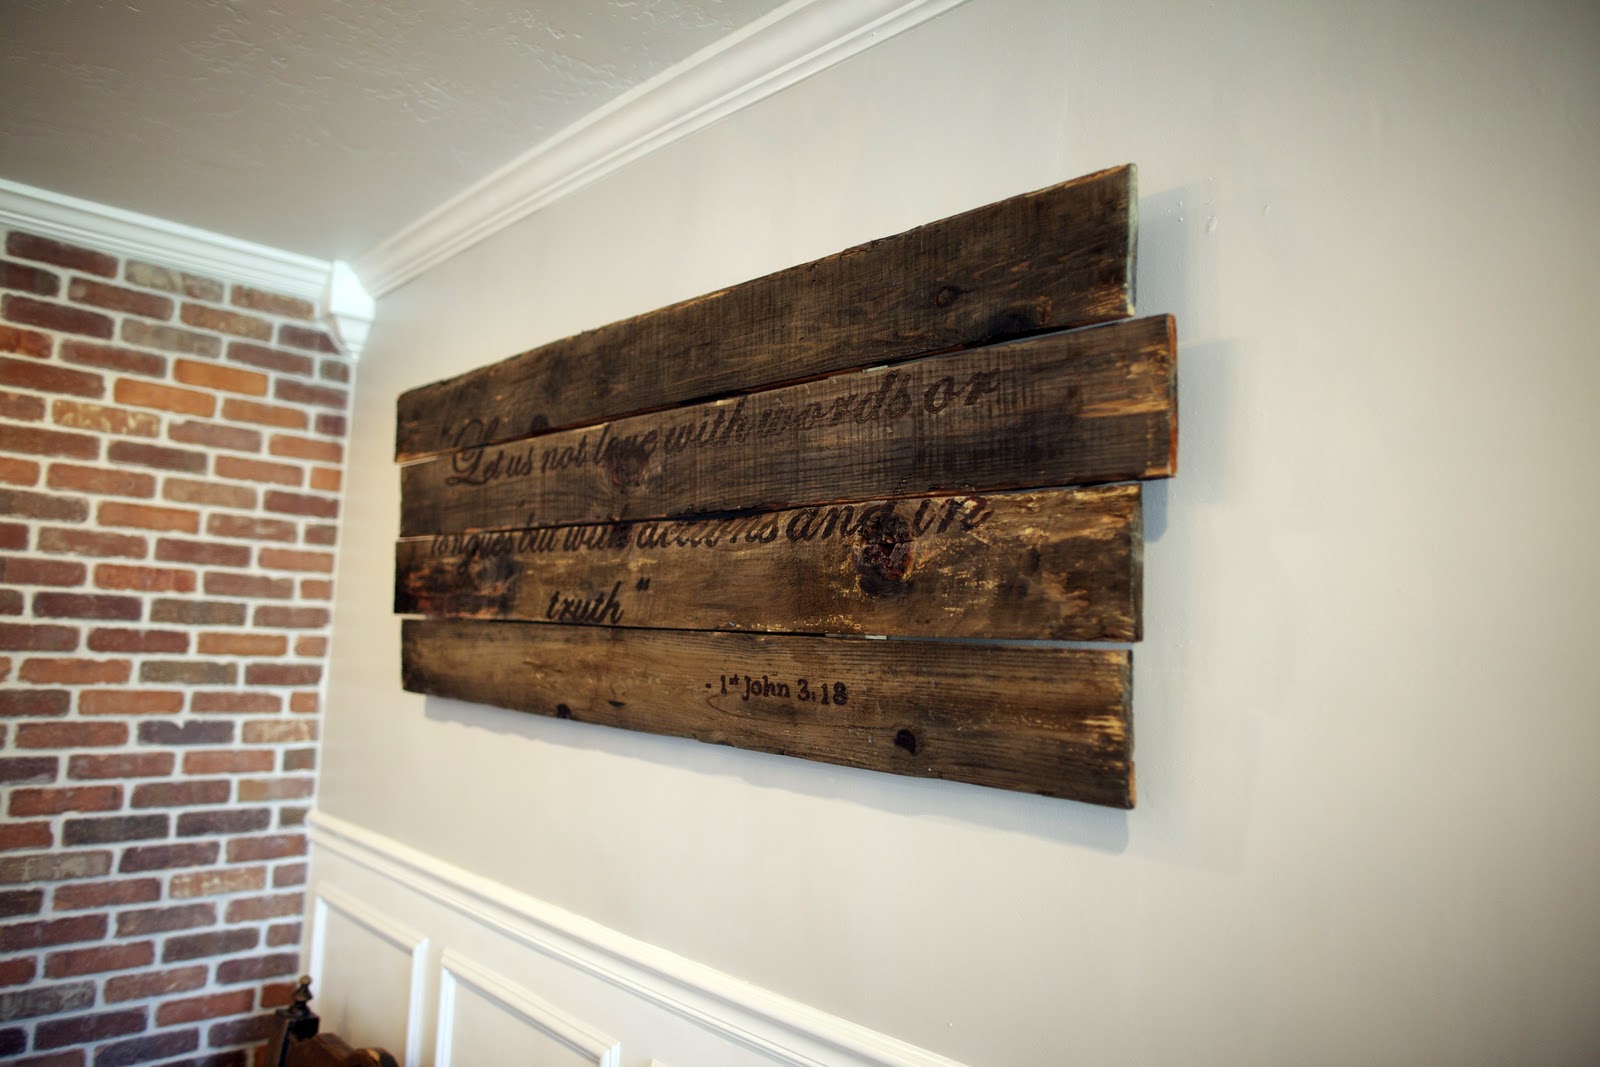
great place where large groups of friends and family can hang out freely, relax, and enjoy some good food. It also is the area we chose to hang our DIY driftwood art we made. I love sitting on the bench {keep in mind- we got this baby for $20 from a garage sale} and drinking my coffee in the mornings, it has a certain coffee shop feel, yet my coffee costs me $.10 instead of $4 {no offense coffee shop owners/frequenters}.

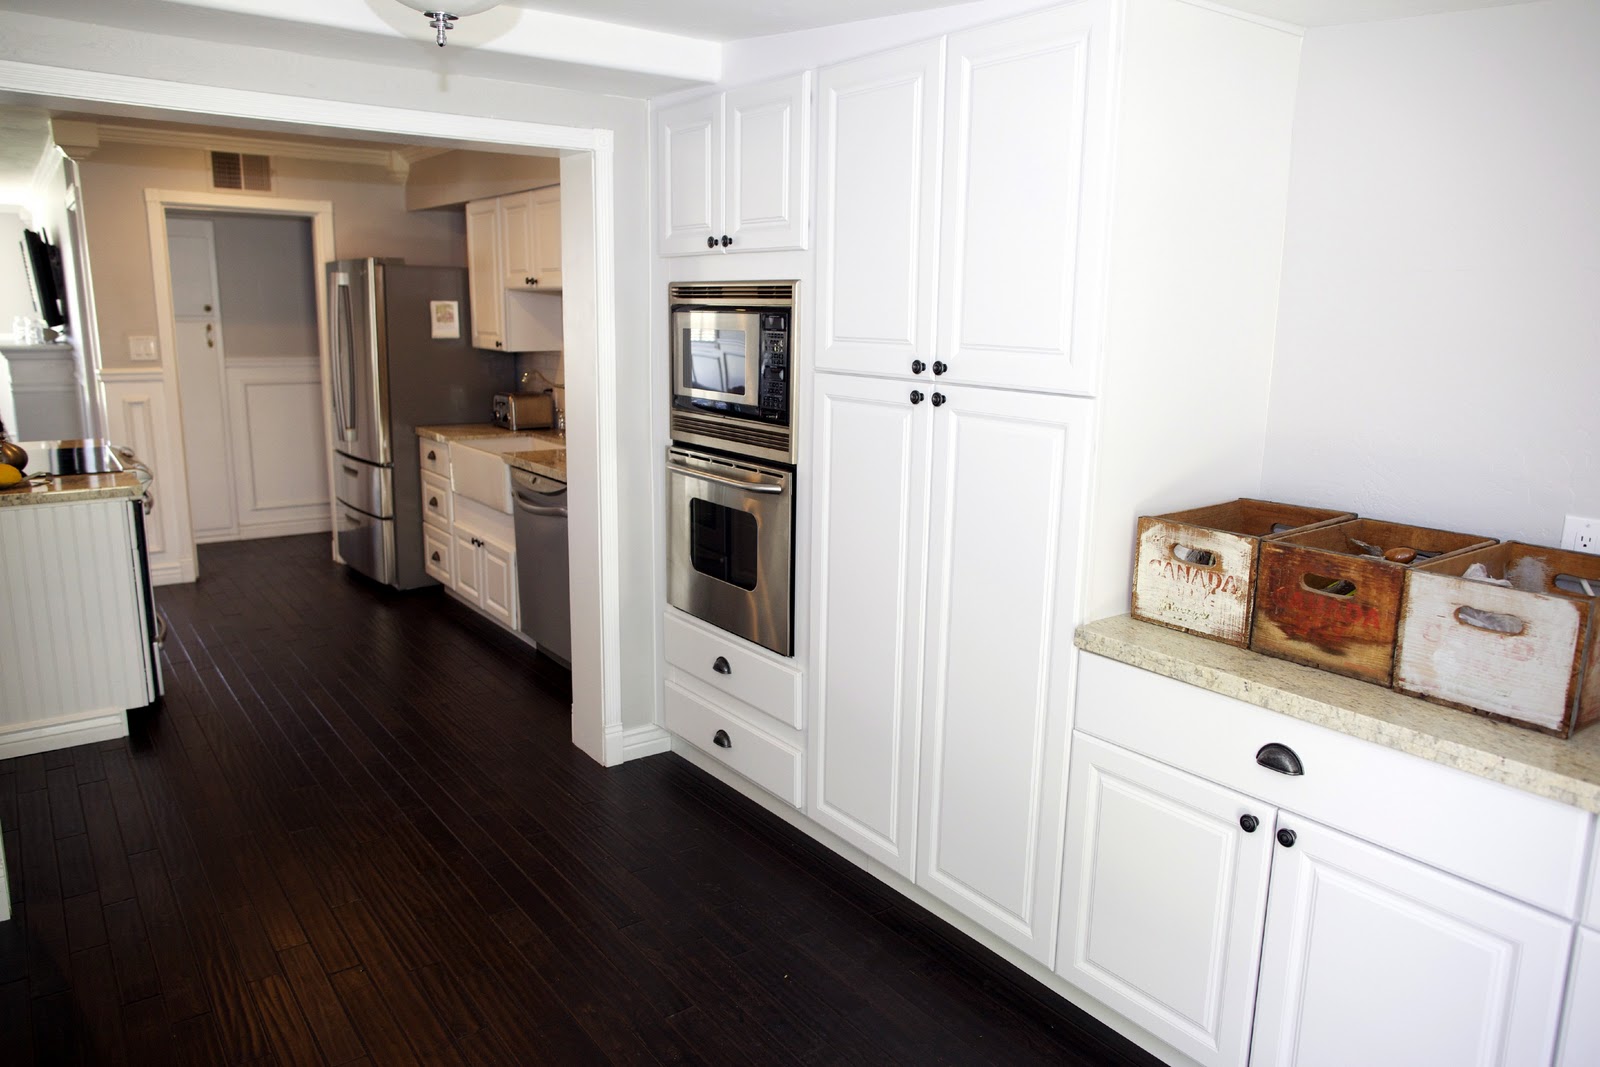
One added benefit that J and I didn’t really even think we would love so much, is the ability to eat at the island. It is incredibly convenient now, and will only continue to get more once we add to the group { you know, kids, not more dogs..!}
 |
| Melissa Young Photo |


 |
| Melissa Young Photo |


 |
| Melissa Young Photo |


how bout some type of lantern for a light is so many out there that i think would be perfect for this area…..btw the boxer is perfect in this new kitchen i hope you and your hubby have many many happy years enjoying a great design…Chris
WOW!! This is absolutely stunning – you guys have done an amazing job! We are about to start our kitchen reno & this is incredibly inspiring! Thakns for sharing.
Mrs BC
xx
WOW! That last picture where you see the whole space is amazing. I love all the ecclectic mix of pieces. It all works beautifully.
WOW! That last picture where you see the whole space is amazing. I love all the ecclectic mix of pieces. It all works beautifully.
Wow girl I knew after the first few updates it was going to be awesome by DAMN. DAMN. DAMN. Its FREAKING AWESOME but you know that.
I’m going to be featuring you next week – I’ll send you an email once the post it up.
Hugs,
Rach @ Mrs-Adventure
Oh. My. Goodness. I cannot believe how amazing it turned out!!! Seriously, stunning! I love the flow and home-y-ness to it. Your mini coffee shop will be the perfect get together spot! I seriously looooove it!!!
OH MY!!!! You two are amazing. This is gorgeous. So incredibly impressive. Lots of drool going on over here – and for once, it’s not coming from the Bulldogs.
That brick wall…swoon and those stools more swooning and drooling. Gorgeous job and I’m with Chris, how about a great lantern. I actually found a used outdoor lantern at a garage sale for $3 and hung it in my living room. After some research, I found it online for over $300! Anyway, whatever you end up with will surely be gorgeous.
LOVE that bench!!!
You guys did a very nice job! As a kitchen designer I would higly suggest you get some support under you island bar! 9″ is the max overhang on granite without support. Hopefully that is one of your finish up projects=)
That looks absolutely AMAZING!!! WOW!
I am not sure what I love more…your $20 bench? WHAT? Or the amazing Island that makes your space look so LARGE! I love love love it! its perfect. Good work Lenitines. And I feel like it didn’t take all that long!
It is STUNNING! So beautiful! Don’t you love it when a plan comes together?! I am curious about the floors – you have two big dogs, so how do they hold up with scratches, dings, etc? We are planning to re-do our floors sometime soon and are considering that hand scraped look (probably more forgiving if you have a big dog, which we do).
Turned out wonderful 🙂
Dang! I love all of the details and that floor is to die for! Amazing job!
http://www.turnuptherad.blogspot.com
THANK YOU ALL SO MUCH! Your words are bringing the biggest smile ever to my face!! Were so happy you guys like it as much as we do! Thanks for the advice on lights, were looking in to some different options-trying to stay away from the boobie look:) Although, we unfortunately we cant do lanterns {or anything that hangs that much} because of the ceilings height. Bummer huh!
@Tellerallaboutit: The floors hold up pretty well. As to be expected we definitely get scratches in them, but I honestly dont know if its more from the dogs, or more from us moving furniture {when we dont have the moving pads on them}. Thats exactly why we went with the ‘hand scraped’ wood in the first place though, that way we didnt freak out over every little scratch! Good luck- you will love them!
@Annonoymous- we were originally going to do some supports, but our installation company put steel rods underneath that give enough support! Thanks for looking out though!
<3,
Adri
Could you elaborate a bit on your floor? It’s stunning. You mentioned it was discontinued, such a tragedy. Did you install it yourself or have it done? Was it prefinished/stained? What type of wood did you go with? We’re buying a fixer upper and I’d love to do something similar to my floors.
Elise- we had it installed. It is a solid wood and we glued it down. Hope your house is going well! Sorry for the super late reply
Wow, that is an unbelievable transformation! You guys have amazing taste. My sister just happened to walk by when I was looking at the pictures and she thought it was out of a magazine. Seriously good stuff. You two should get into reno-ing houses; not just your own. 😉
Gorgeous! Love it! I love the new with the old, perfect match!
It looks so amaaing! I am so impressed, this place has the perfect mix of country and city! Definitely looks much more chic than Phoenix ( although I love my home) You all deserve a big pat on the back!
<3 Kat @ indignantcorgi
I love the additional seating area in the kitchen–not to mention all of the one-of-a-kind looking pieces! I know that you list some stores in AZ that you like, but do you have any favorite websites for home shopping? Unfortunately I’m clear across the country in NJ! Thanks and congrats on the beautiful reno.!
A-maz-ing! Wow! Especially love: the brick wall, chandelier, island and countertops. Congrats!
that is an amazing makeover!!!! WOW so impressed!!!!
Love it! Love the dark floors, farm sink, subway tile and white cabinets! That chandelier is great too. I am arguing with my husband about one for our bathroom.
The sitting area in the kitchen is totally awesome! Easy to gather in the kitchen or brag a coffee and read a book!
I think we are using the exact same corner pieces in our crown molding!
Wow! To be honest I wasn’t sure if I liked the design on the Lowe’s room planner. HOWEVER. It is nothing short of amazing. LOVE the dark hand scraped wood and farmhouse kitchen sink. I just purchased a miner’s/factory car like the one you have. Did you leave in original state or refinish? I can’t tell.
I love love love it. You did a great job! I have boobie colored boobie lights in almost EVERY ROOM in the house. EVERY ROOM. Did you get that practically every room has one? It’s devastating. I love the fact that I found someone else who calls them boobie lamps! Would it be too much to do one of those lights with a rack for hanging pots–all vintagesk? Or maybe you can do a non chandy pendant light like http://www.homedepot.com/Lighting-Fans-Indoor-Lighting-Indoor-Ceiling-Lighting/h_d1/N-5yc1vZbvnl/R-100675112/h_d2/ProductDisplay?langId=-1&storeId=10051&catalogId=10053
Or your other options are track lighting and one of these big modern light balls… http://www.homedepot.com/Lighting-Fans-Indoor-Lighting-Indoor-Ceiling-Lighting/h_d1/N-5yc1vZbvnl/R-100654289/h_d2/ProductDisplay?langId=-1&storeId=10051&catalogId=10053
Tasha: We have not refinished the miners cart yet, but we do plan to spray it with a coat of poly in the next couple weeks…..hopefully. That is the only thing that we are going to do to it.
<3
Adri
I’m new to your blog – found through BNOP. Your kitchen looks amazing! The brick wall adds so much character and I love that used a chandelier in there. Love the mix of old & new!
looks SO good, what a bench that is in your kitchen!
Looks great! I want a kitchen makeover by you!
wow! i love it all, especially your card file, that is very cool. the kitchen is really beautiful. i have a party going on if you’d like to share this. http://typeadecorating.blogspot.com/
There are no words………I love those chairs!!
Can I have them???
Where did you find them they are so cute!!
The sofa, the table!!
WOW and WOW
Me again – I’ve been all over your blog!
I love it!!
I just became a follower!
And I’m serious I really want those chairs!!! ha
Rene- thank you ! We adore the brick wall!
Cape on the corner- I know. I still can’t believe we got it for only $20!!
Michelle- deal, ill do your kitchen and you help make me more ‘crafty’! haha
Tammy- thank you! I just became your newest follower, and linked up the kitchen!
Jane- you are too cute! Thanks so much! No, you cannot have them…BUT we got them at a store called Modern Manor and they sell stuff similar to them all the time! You should check it out!
<3,
Adri
Wow! Great transformation!
LOVE the sink!
Thanks for linking with Sugar & Spice.
thanks so much for linking this up to my party, i love your kithchen!!!
BRILLIANT! I love it all! Perfect mix of old and new!
Adri-
Remodeling is purgatory…really. We’ve been thru a basement and kitchen/dining room in the past 4 years…I feel ya…
Thanks for linking to Creative Juice Thursday! I hope to see you back this week {party opens on Wed night @ 8pm CST}
The finished product is absolutely beautiful. JOB WELL DONE!
What is the paint colour?? I had a good read and followed the links to the progress posts and I can’t seem to find it.
It looks very similar to a shade I used in my last house that I’m considering using again. Is it more beige/taupe/gray??
If you have a moment to write me and let me know the paint colour I would really appreciate it.
THANKS!
Beautiful!
We redid our early sixties avocado and grime kitchen ouirselves almost 4 years ago and still have bits to finish or rethink. Still, I love it every day as I’m sure you will too!
Where did you find the stools with backs? They are fabulous but not nearly as perfect as the bench!!!
We used a huge buffet as our island with giant carvings of the Man of the North Wind at each corner. Some people think we are crazy but not everybody wants to live in a cookie cutter house.
Great work!!! Sally J
Hopeless Chest- thanks for pointing it out to me that I needed to be more clear on what we went with. We used Benjamin Moores Stonington Grey, but put it in a Behr Ultra Premium Plus eggshell base, because we always use Behr. im glad you like it:)
Sally J- thanks so much! its nice to know that people understand the process you have to go through, right?! We got the stools and miners cart at Modern Manor here in Phoenix. They are an amazing midcentury modern furniture store!
Thank you everyone for your kind words! Y’all make my day, everyday!
<3,
Adri
WOW wonderful, great job. I love everything.
I want to ask though why you didn’t remove that little section of the wall between the cabinets and oven?
I became a follower a few weeks ago- I can’t remember how I found your blog but I LOVE the way your kitchen turned out! My favorite thing is that darling little couch!! We gutted & remodeled our kitchen, we are still working on a few little details, I want to share it on my blog but it seems a little overwhelming to go through it all again 🙂
love it! could you tell me the brand and style of cabinet you chose from Lowes?
Sandy Quilts- We have that wall up in between because it is a load-bearing wall. We couldn’t remove it without going WAYY over budget!
Rachel- thanks so much! and you should totally post about your makeover. Its so encouraging to others!
The post that goes into detail about the cabinets is here:https://dreambookdesign.com/2011/02/kitchen-makeover-home-depot-kitchen.html
Hope this helps!
<3,
Adri
Thanks for clearing up about that little section of the wall. I’m getting ready to have a small section (similar to yours) between living/dining rooms. I am leaving the header as is. I completely understand budget … oh if only money did grow on trees.
Love love your redo.
Yeah…not sure what to say, but your place is awesome. The kitchen, the sitting area, your buffet made out of library drawers. I can only hope that one day I might have just 1 room that looks like your home.
Thanks so much for showing us your place. Now I have to go and read your old posts!
Emily
http://lovelybeasts.blogspot.com/
Hi Adrianne. I love your blog and I adore your kitchen. We have a kitchen remodel in our future and it so daunting. We are also on a limited budget and it can be very frustrating. I’m so impressed by your finished product and all your choices. I know it’s rude to ask this and you don’t have to answer but do you mind sharing how much you spent? I would just like to know what is possible! Thanks again for sharing your beautiful home and great ideas!!! -Carrie
I see that you love mason jars too! I made some really cute lights for my kitchen with them
http://thesunsetlane.blogspot.com/2011/03/what-have-i-been-up-to-you-ask.html
They were easy, cute and super cheap!
Emily and Kari-thx so muc!
Carrie archer- I can’t figure out a way to email you thru here, so email me at dreambookdesign@gmail.com and I’ll give u more details:)
<3,
adri
HAHAHAHa, I am so glad that someone else Calls those lights exactly as they see them “boobie lights”!!! Every time I tell someone that I hate boobie lights, I get a look of shock. P.S. gorgeous renovations!!! I will gather inspiration here in the future too. 🙂
I hate boob lights too. Since you live in such a hot climate, what about a fan? I bought an amazing one online for my kitchen with a light on it. Everyone comments at how gorgeous it is. There are really neat new ones out there. That is what I would do.
I LOVE THE BRICK WALL and can’t wait for the tutorial on the wood floor (a dream of mine:)
Looking forward……
debraclaytor@yahoo.com
Love,Love, LOVE! Amazing vision and it turned out beautiful.
Hi…I am new to your blog (and LOVE it by the way) but wanted to share a VERY cool lighting source with you. Not sure if you already settled on lighting for those areas that you hated before (the boobie lights specifically – LOL) but this place (http://www.barnlightelectric.com/) has some amazing finds that go well with your modern-meshed-with-rustic-vintage vibe! Check them out. Some of the barn pendants/modern pendants are pretty amazing!!
I added you to the side bar of my blog so I can continue to follow along with what you guys do! I am in awe of your home!! STUNNING!!
🙂
-lisa
http://turning-the-tables.blogspot.com/
i don’t usually comment on blogs, but i had to on yours. i stumbled across your blog from miss mustard seed’s link party and saw you fabulous kitchen. the best part? we recently renovated our kitchen and chose SO many of the same things. same granite, sink, faucet, hardware, etc, very similar looking appliances. crazy! by default, you have great taste! 🙂
briana @ bungalowhutch.com
Lovely work. Your kitchen looks great! I have a question: I noticed that first you just cut out a portion of the wall, and then you decided to demo the whole wall and put in an island. I am thinking about the same thing in my kitchen, but I hear that demolishing an entire wall is WAY more expensive than cutouts. Has this been true in your experience? Please reply back at gardener2005@att.net
Tasha- the table is in its original state, we just recently sealed it!
Briana- that is so random! I love that we have similar taste, it means it must be good:):)
Ngozi- demoing the whole wall was definitely more expensive, but for what we wanted it was the only option. The demo itself wasnt the main cost, it was more so the putting in gas lines. Hope this helps! I do vote though that if an island is REALLY what your wanting, do it. You dont want to re-do your kitchen, and always wish that it was done differently is you just spent a little more, ya know?
<3,
Adri
I too am in awe of your home. So far the only thing I have anywhere similar is the coffee maker. You guys are amazing!
WOW!!! Love it all! Y’all did a great job…..off to look at the rest of your blog =)
{here from Better After}
Wow, the entire space is stunning! You guys did an amazing job! This space has major personality! I’m a new follower!
The makeover is really great. The results are amazing. The kitchen has a new ambiance right now. Good work!
I found your blog on pinterest and I am OBSESSED! We are doing a brick wall in our new home!
You have a really beautiful home…I love your style!
In your inspiration post for this kitchen makeover, you had said you wanted gray grout with the subway tile backsplash. What made you choose white grout over gray, in the end?
Beautiful house!
Thanks Marvin the Martian and Allison!
We ended up going with white grout since we were a little scared that it could’ve clashed with our counter tops. Now that its done, I think it could’ve been great either way though! Hope that helps:)
I’m wondering the same thing as Marvin the Martian. We’re just getting ready to do white subway tile in out kitchen as well and I’m trying to pick the grout color. Thanks!! (Love your kitchen!)
I liked the colorful tiles in the back
Upholstery
Fab-u-lous!!!
I have such sink envy, I can’t tell you!
I realize im a bit late here but if by any chance you still check in here i just wanted to say how beautiful and inspiring this makeover was for me. I stumbled accross it whilst googling “white subway tile, grey grout” and im glad i did. Im not sure what we will go with. The white looks stunning, but im having a bevelled tile and thought grey grout would make it pop a bit more (at $65 a square metre we want all the emphasis on those tiles as we can get).
I too love the way you have so many different textures and one of a kind pieces in the overall area. What i wouldnt do to cook in that space. Its breath taking.
Al.
This is really incredible! I am actually out of words for this. However, just for the sake of praising your work, I would say you really did transform your house into a wonderful home. I am pleased to see how good everything turned out to be. I would love to have such a place like this. This is really an inspiration. Thank you for posting! Congratulations!
I know I’m a little late to the party but was wondering what time of Bianco countertop you choose? It looks more tan then previous pictures to be Montanha? Ran across your blog as we are trying to decide between River White & Bainco Montanha ourselves. Thanks!