
Process:

I started by measuring 5 in. across and 6in. down from the middle point on a piece of cardstock. Cut it out and used that as my guidelines for all 7 pendants. I used a dissolvable fabric pen and traced out the pendants on the burlap. Here you could have just as easily pinned the pendant to the fabric and cut around it, I just did this my own way.

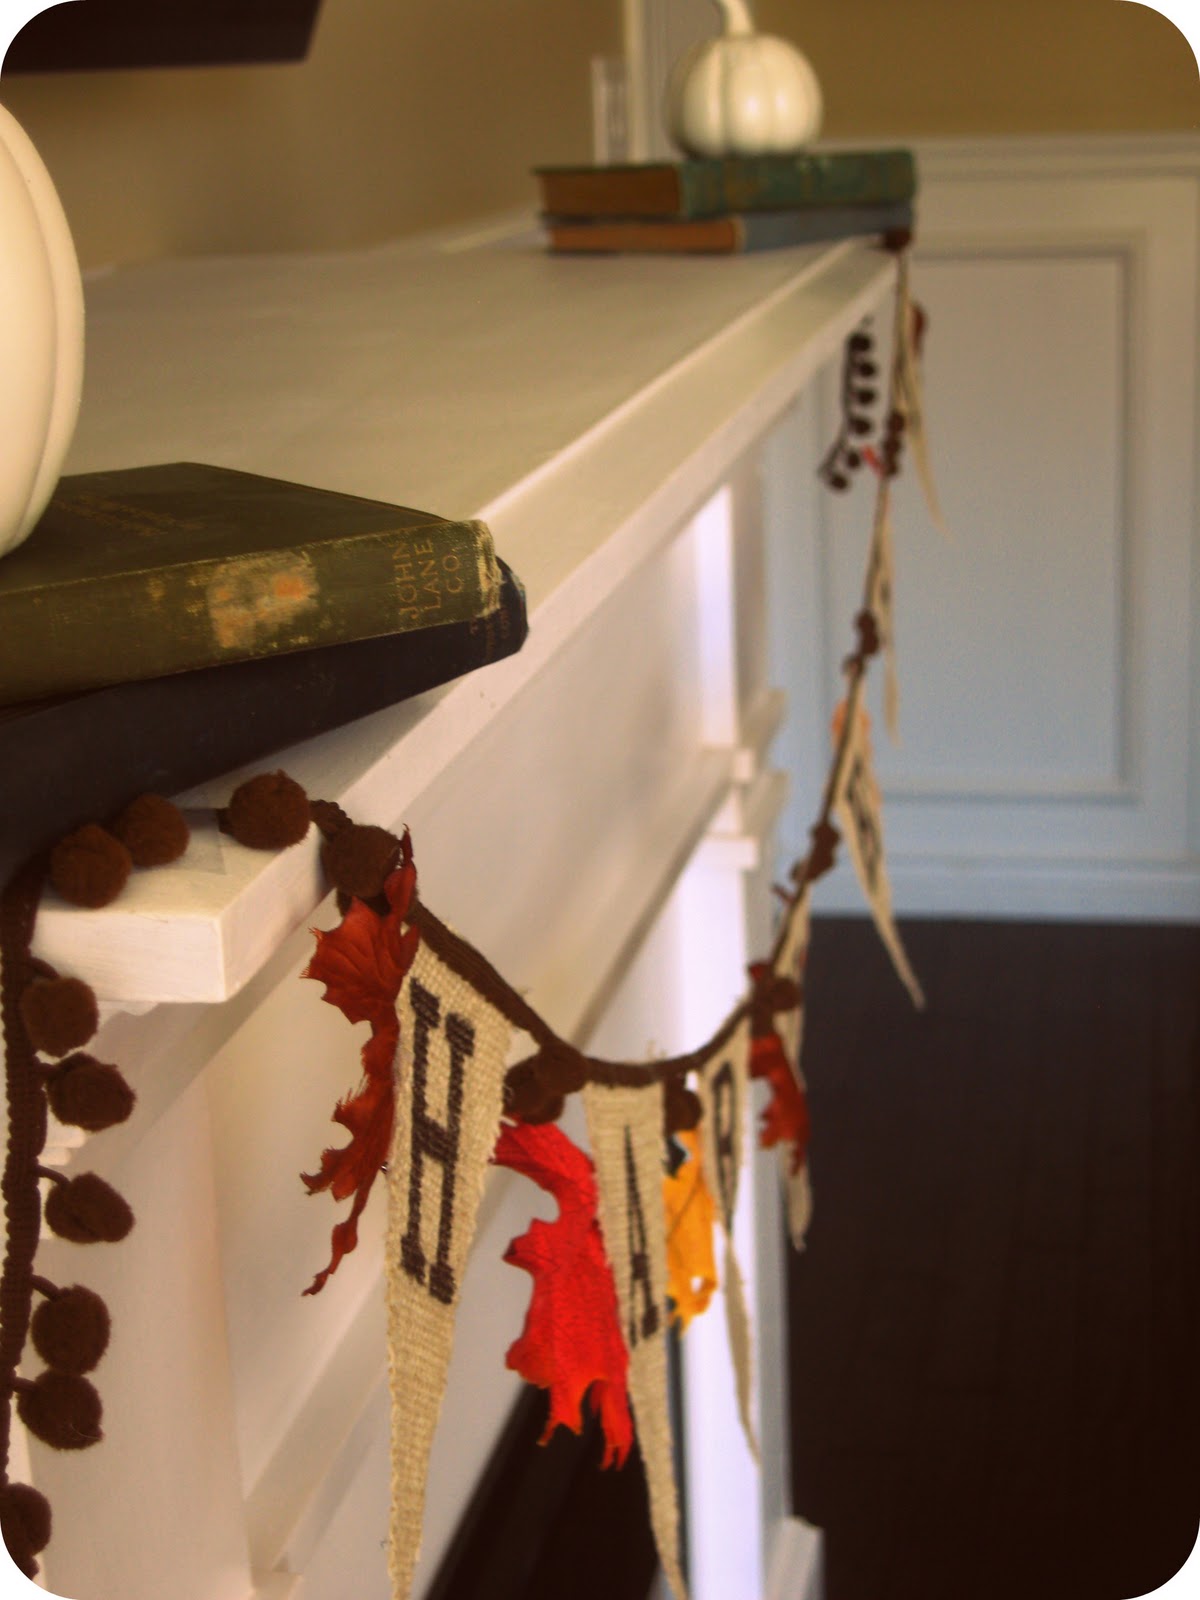
I then ironed the pieces {since I got the burlap at SAS Fabrics they were pretty wrinkly} so that when i put them up they didn’t look like a mess

This part is where my stroke of genius came in! You all remember how terrible my L looked on my pumpkins right?! Well I decided to be smart this time and print out the letters and then trace them onto the burlap. All I did was tape the paper under the burlap on my window and trace away. SOO much easier and so much more pretty!

Next I simply filled in the letters with a handy-dandy brown sharpie. I definitely could have used fabric paint, but guess what- I had a sharpie already, which didn’t require me to A. Spend more money B. leave the house, since I did this in my PJs:) Sharpie it was!

After the letters were all filled in I Modge Podge all the pendants. This wasn’t necessary, but I think that the pendants will last a lot longer now. I had already noticed that the edges were fraying, and I didn’t want to dig this out of storage for Fall next year and only have a few strands left in place! This gave them all a sturdy feel and hopefully will prevent from any more fraying.

This is where I had J come in. I am TERRIBLE, I repeat, TERRRRRIBLE at math. Any type of math freaks me out. So I simply had him measure our fireplace and then figure out how far apart each letter needed to be from each other to be even. I highly suggest doing this because you really don’t want to get them all glued on and then realize that its not even spacing. Now for this I used Fabric-Tac, simply because I could not for the life of me find my hot glue gun. Who has a bag of about 100 sticks of glue, but no gun to be found…ugh it was frustrating. The Fabric-Tac ended up working beautifully though, so no worries. I glued the brown ball thingie {again, very professional terms used over here at Dream Book} to the front and cut off the balls {yikes} that laid on top of the pendants. I also glued on some Fall leaves with the same Fabric-Tac on the backs of each letter. Hoorraayy- it’s finished! So easy, simple, and super cute!


Very cute! I wish I had a mantel to make one for!
You totally had me with that amazing piece in your header…it’s wonderful! These banners are so great, so easy, so inexpensive. I’ve been thinking of jumping on the banner bandwagon, but haven’t seen one I wanted to make yet. This is perfect. Thanks! Lisa~
Just wanted to let you know that I featured your wonderful blog over at my site… you have amazing creative talent!!
~Megan
http://www.littleblueprints.blogspot.com
Pennington Point- Thanks so much!! I hope you do make one soon-theyre too easy and cheap to not!
Megan- Thank you so much for the comments and for featuring us! Hope your readers enjoy:)
<3,
Adri
Love this banner! You have a great
blog!
Jane
Flora Doora
alright sis I am going to tempt this this weekend! I will let you know how it gos!
This comment has been removed by the author.
Cute! It does match my wreath!
-Trish
Oooh, this could work for so many occasions. Love pom-poms.
Omaga….what a cute banner! Totally dig the idea of using the pomp fringe…You’ll have to let us know how the mod podge works out next fall 🙂
So glad you could Mi4M!
I really like this! I really need to make one of these. I LOVE the pom pons. Mine will have to have those!
This is so beautiful! It’s such an elegant fall decoration. I wanted to let you know I’ll be featuring this project on my fall roundup sometime this week over at http://www.craftycritique.com. Feel free to stop by and check it out. Thanks for the great tutorial!
Just love this tutorial. I would have made so many mistakes had I just “winged it” from looking at the picture only. I also don’t care to do the math so I figure out where middle is on my project, bring it to where I will be hanging it and then mark on wall where the middle will go and work out from there. Not very scientific or impressive…but it works for me! 🙂
This banner is so charming with that pom pom trim! I love it!! I’m including your Harvest Banner in a “5 for Friday” round-up of Fall Burlap Projects at my blog this week, including one pic and a link back to this post. Thanks for sharing a great tutorial and an inspiring project! : )
I love the way you printed on the burlap!!
Hi! I’m hosting a Thanksgiving ideas week and am going to feature you in a garland/bunting roundup. I hope you will come over and check it out. Please grab a featured button too! This link will go live first this Saturday morning. http://www.nap-timecreations.com/2012/10/thanksgiving-week-garlandsbuntings.html
Can you tell me what font and size you used for your letters? So cute!
I hate to tell you this, but I don’t remember for the life of me. I’m sorry!!!